Customizing your Minecraft character with unique skins is a great way to express your personal style and enhance your gaming experience. In this extensive guide, we will cover how to add custom skins to Minecraft Java, Bedrock, and Pocket Editions. By following the step-by-step instructions provided, you’ll be able to personalize your character with your favorite skins in no time.
Minecraft Java Edition: Uploading and Applying Custom Skins
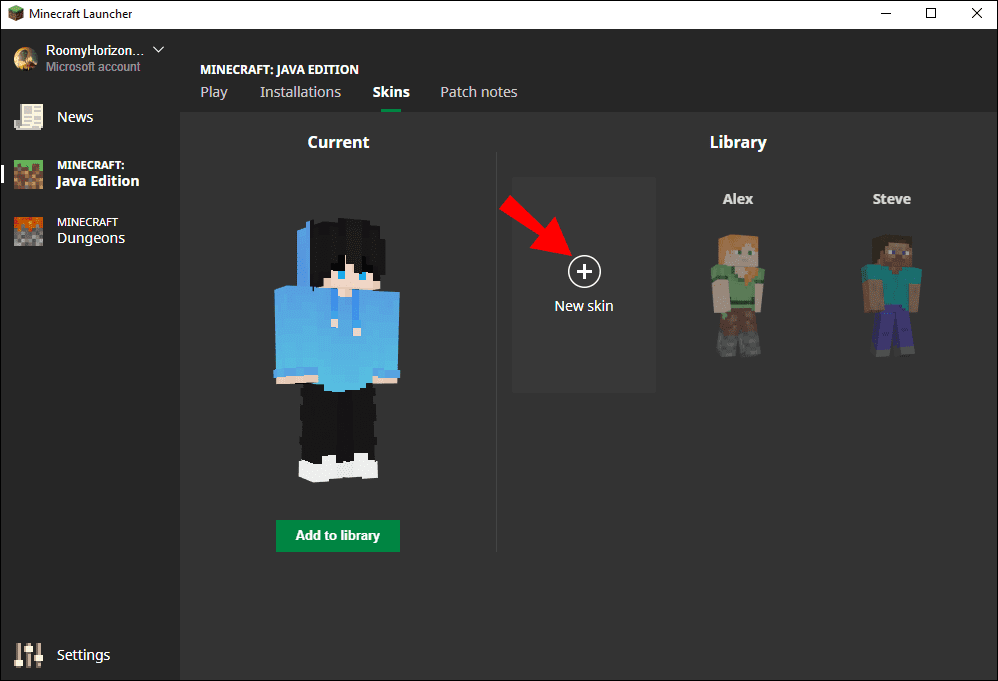
Minecraft Java Edition offers players the ability to upload and use custom skins for their characters. To start, you’ll need to have a custom skin file saved in PNG format on your computer. You can create your own skin using a graphics editor or download one from various Minecraft skin websites.
Step 1: Visit the official Minecraft website (https://minecraft.net/) and log in to your Minecraft account using your email address and password.
Step 2: Navigate to your profile settings by clicking on your account icon and selecting “Profile.”
Step 3: In the “Skins” section, click on the “Upload” or “Select a file” button. Browse to the location where you saved the custom skin file (in PNG format) on your computer.
Step 4: Select the custom skin file and click “Open” or “Upload” to add it to your Minecraft account.
Step 5: Launch the Minecraft Java Edition game on your computer. Before joining a game, click on the “Skins” or “Profile” button in the main menu.
Step 6: Locate the custom skin in your list of uploaded skins. Click on the custom skin and select “Use” or “Apply” to equip it on your character.
Minecraft Bedrock Edition: Custom Skins on Windows 10 and Consoles
Minecraft Bedrock Edition is available on various platforms, including Windows 10, Xbox, PlayStation, and Nintendo Switch. Custom skins can be added to the Windows 10 version, while console versions offer a selection of purchasable skins through the in-game marketplace.
Adding Custom Skins to Windows 10:
Step 1: Launch the Minecraft Bedrock Edition game on your Windows 10 computer.
Step 2: From the main menu, navigate to the “Profile” or “Skins” section.
Step 3: Click on the “Browse” or “Import” button and locate the custom skin file (in PNG format) on your computer.
Step 4: Select the custom skin file and click “Open” or “Import” to add it to your Minecraft game.
Step 5: Locate the custom skin in your list of available skins. Click on the custom skin and select “Use” or “Apply” to equip it on your character.
Console Versions:
Unfortunately, custom skins cannot be added to console versions of Minecraft Bedrock Edition. However, you can purchase and apply a variety of skins from the in-game marketplace.
Minecraft Pocket Edition: Adding Custom Skins on Mobile Devices
Minecraft Pocket Edition allows players to add custom skins on both Android and iOS devices. The process for adding custom skins varies slightly between the two platforms.
Android:
Step 1: Download a custom skin file (in PNG format) from a reputable Minecraft skin website using your Android device. Save the file to your device’s storage.
Step 2: Launch the Minecraft Pocket Edition game on your Android device.
Step 3: From the main menu, navigate to the “Profile” or “Skins” section.
Step 4: Click on the “Browse” or “Import” button and locate the custom skin file in your device’s storage.
Step 5: Select the custom skin file and click “Open” or “Import” to add it to your Minecraft game.
Step 6: Locate the custom skin in your list of available skins. Click on the custom skin and select “Use” or “Apply” to equip it on your character.
iOS:
Step 1: Download a custom skin file (in PNG format) from a reputable Minecraft skin website using your iOS device. Save the file to your device’s storage, usually in the Photos app.
Step 2: Launch the Minecraft Pocket Edition game on your iOS device.
Step 3: From the main menu, navigate to the “Profile” or “Skins” section.
Step 4: Click on the “Browse” or “Import” button and locate the custom skin file in your device’s storage (typically within the Photos app).
Step 5: Select the custom skin file and click “Open” or “Import” to add it to your Minecraft game.
Step 6: Locate the custom skin in your list of available skins. Click on the custom skin and select “Use” or “Apply” to equip it on your character.
Conclusion
Adding custom skins to your Minecraft character is a fun and easy way to personalize your gaming experience. Whether you play on Java, Bedrock, or Pocket Edition, this comprehensive guide has provided you with the necessary steps to upload and apply your favorite custom skins. Now, it’s time to show off your unique style in the Minecraft world and enjoy your personalized gaming experience.


Raydelis - 04/11/2026 - Upvote (0) / Downvote
I am a YouTuber that post is about Roblox, but my first video will be about Minecraft so I wanna have my own skin for me and my fans