Venturing into the blocky realms of Minecraft, players often find themselves in need of speedy and efficient transportation methods. From vast underground mines to sprawling overworld bases, moving from one point to another can be a hefty task. Enter the indispensable rail system! This guide is dedicated to helping both Minecraft newbies and veteran crafters understand the rail recipe in Minecraft. By the end, you’ll not only be equipped to craft rails with confidence but also place them strategically for optimal use. So, grab your crafting table, and let’s get started on laying down those tracks!
Why Rails are Essential in Minecraft
The beauty of Minecraft lies in its ability to allow players to shape the world according to their imagination. One of the game’s subtle yet pivotal components is the rail system. While they may not be the first item new players think to craft, rails have grown to become an integral part of advanced gameplay. Here’s why:
Efficient Transportation
In the sprawling landscapes of Minecraft, walking or sprinting can be time-consuming and often risky, especially when traversing through hostile territories. Rails provide an effective solution to this problem. By setting up a rail system, players can travel vast distances in a fraction of the time it would take on foot. Whether it’s commuting between bases, visiting a friend’s village, or simply exploring the far reaches of your world, rails ensure that you get there swiftly and safely.
Automating Resource Collection
For the ambitious miners and builders of Minecraft, resource collection is a never-ending task. Manually transporting items like ores, crops, and other resources from one point to another is not only tedious but can also be inefficient. With a well-designed rail system and the use of minecarts with chests or hoppers, players can automate the collection and distribution of resources. This automation is especially useful in large-scale mining operations, where ores can be transported from deep underground to surface-level storage facilities without manual intervention.
Fun and Functional Roller Coasters
Beyond the practical applications, rails in Minecraft open up a world of entertainment. Ever dreamt of building your very own roller coaster? With rails, powered rails, and a touch of redstone magic, players can design thrilling rides that loop, dive, and spiral. These roller coasters can be a fantastic centerpiece for an amusement park, a challenging obstacle course, or just a fun way to experience the highs and lows of your Minecraft terrain. After all, who doesn’t love a good ride?
In essence, rails are not just about moving from point A to B; they are about reshaping the way we interact with the vast Minecraft universe, making it more efficient, automated, and fun!
Ingredients Needed for the Rail Recipe
In the vast world of Minecraft, rail systems play an essential role in efficient transportation and automated processes. Crafting these rail systems requires some fundamental ingredients. Depending on the type of rail you’re aiming to create, the required components may vary. Let’s delve into the primary materials needed for crafting the most common types of rails.
Iron Ingots
Iron ingots are the result of smelting iron ore blocks in a furnace. This shiny metal is the backbone for crafting many items in Minecraft, and rails are no exception. Iron ingots form the primary structure of the rail tracks, ensuring durability and longevity. They are especially critical for crafting regular rails and powered rails.
Sticks
Sticks, crafted from two wooden planks vertically in a crafting table, act as the cross ties in the rail tracks, keeping the iron ingots in place. They are a crucial component in the standard rail recipe.
Different Rail Types and Their Recipes
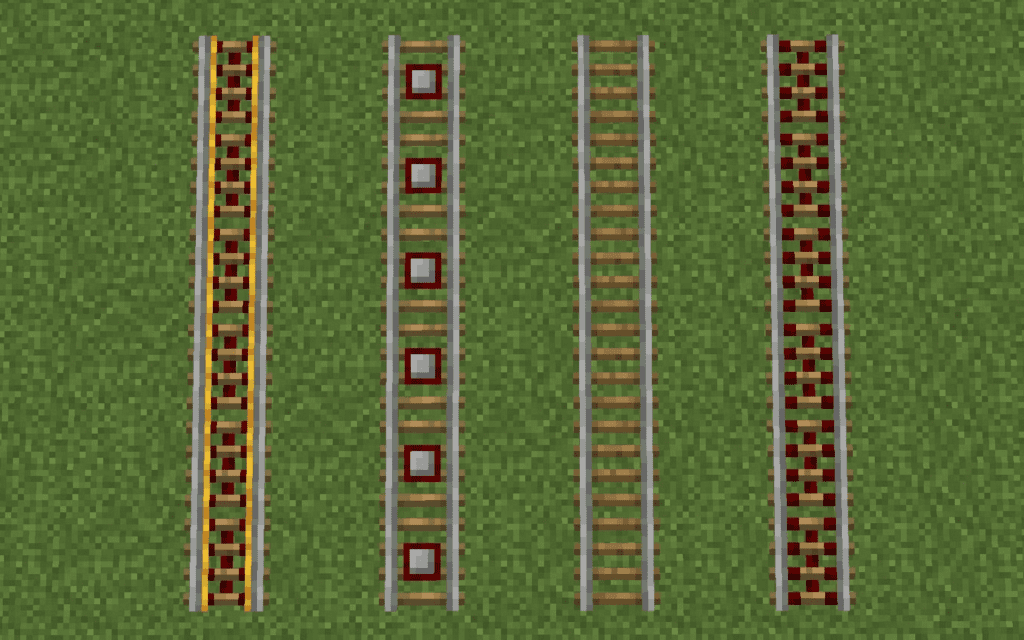
In Minecraft, rails come in various types, each tailored for specific uses:
| Rail Type | Ingredients | Crafting Pattern |
|---|---|---|
| Regular Rails | 6 Iron Ingots, 1 Stick | Iron Stick Iron <br> Iron – Iron <br> Iron – Iron |
| Powered Rails | 6 Gold Ingots, 1 Stick, 1 Redstone Dust | Gold Stick Gold <br> Gold Dust Gold <br> Gold – Gold |
| Detector Rails | 6 Iron Ingots, 1 Stone Pressure Plate, 1 Redstone Dust | Iron Plate Iron <br> Iron Dust Iron <br> Iron – Iron |
| Activator Rails | 6 Iron Ingots, 2 Sticks, 1 Redstone Torch | Iron Stick Iron <br> Iron Torch Iron <br> Iron Stick Iron |
Note: The “-” in the crafting pattern signifies an empty slot in the crafting table.
With these tables in hand, you’re all set to venture into the world of Minecraft and set up your railway systems!
Step-by-Step Rail Crafting Guide
Laying down tracks in Minecraft is not just about having the right resources but also about using them correctly. Crafting rails might seem like a simple task to the experienced player, but for those new to the game, a step-by-step guide can be invaluable. Let’s delve into the intricate process of crafting rails.
Gathering Resources
- Mining for Iron: Begin your rail-making journey by mining for iron ore. These are typically found below the ground level, often in cave systems. Iron ores have a characteristic appearance with tan speckles on a gray block.
- Smelting the Ore: Once you’ve gathered a decent amount of iron ore, return to your base and use a furnace to smelt them into iron ingots. Simply place the iron ore in the top slot of the furnace and fuel (like coal or wood) in the bottom slot. After a few seconds, you’ll receive an iron ingot.
- Crafting Sticks: While your iron is smelting, use the crafting table to transform wooden planks into sticks. Place two wooden planks, one above the other, in any column of the crafting table to get four sticks.
Accessing the Crafting Table
- Crafting the Table: If you don’t have a crafting table yet, it’s time to make one. In your personal crafting grid (found in your inventory screen), place four wooden planks in a 2×2 pattern. This will produce a crafting table.
- Placing the Table: Right-click (or tap, depending on your device) on the ground with the crafting table in hand to place it in the world.
- Using the Table: Right-click on the crafting table to access its 3×3 crafting grid, which you’ll need to craft rails.
Placing the Materials in the Right Configuration
For crafting regular rails:
- Iron Placement: Place an iron ingot in the leftmost column’s top slot, middle slot, and bottom slot. Do the same for the rightmost column.
- Stick Placement: In the center slot of the crafting table, place a stick.
- Collecting Rails: Once the materials are correctly configured, you will see a rail icon appear in the result box of the crafting table. Click on this icon to transfer the rails to your inventory. Each crafting combination yields 16 rails.
With these steps, you’ll have a batch of new rails ready for your transportation endeavors. As you grow in experience, consider expanding to more advanced rail types and systems, allowing for automation and improved transportation speeds.
Tips and Tricks for Effective Rail Placement
Laying down rails is just the beginning of your railway adventure in Minecraft. To truly make the most of your rail system, consider these expert tips and tricks that can elevate your transportation experience.
Maximizing Rail Efficiency
- Optimal Slopes: Avoid steep inclines in your tracks. Minecarts slow down significantly on uphill tracks. If you need to change levels, try to do so gradually with a gentle slope.
- Minimize Turns: Sharp turns can slow down a minecart. When plotting your track’s path, aim for as straight a line as possible, using turns only when necessary.
- Booster Tracks: Regularly spaced powered rails (activated by redstone) can keep your minecart at maximum speed. Typically, placing one powered rail every 20-25 blocks will maintain a cart’s momentum.
Combining with Powered Rails and Redstone
- Starting and Stopping: Using powered rails at the beginning and end of your tracks will allow minecarts to start and stop smoothly. Simply place a powered rail and activate it with a redstone source, like a lever or button.
- Hills and Slopes: Place powered rails on uphill sections to give minecarts the boost they need to reach the top.
- Automatic Stations: With a combination of detector rails, redstone, and powered rails, you can create stations where minecarts automatically stop, wait, and then proceed.
Ensuring Passenger Safety
- Enclosed Tracks: Especially in areas with many hostile mobs, enclose your railway in a tunnel or add walls and a ceiling to prevent unwanted guests from boarding or blocking your path.
- Lighting: Adequate lighting along the track ensures mobs don’t spawn on it. Place torches, lanterns, or other light sources at regular intervals.
- Buffer Stops: At the end of tracks, consider placing a block or a powered rail (turned off) to stop the minecart from falling off or going the wrong way.
Conclusion
Embrace the world of efficient transportation in Minecraft with the art of rail crafting! Whether you’re connecting distant bases, setting up an elaborate mining operation, or simply looking for a joyride through the beautiful biomes, a well-crafted and placed rail system can significantly elevate your Minecraft experience. So gather those materials, craft with precision, and lay down your tracks to a more connected and accessible Minecraft world!